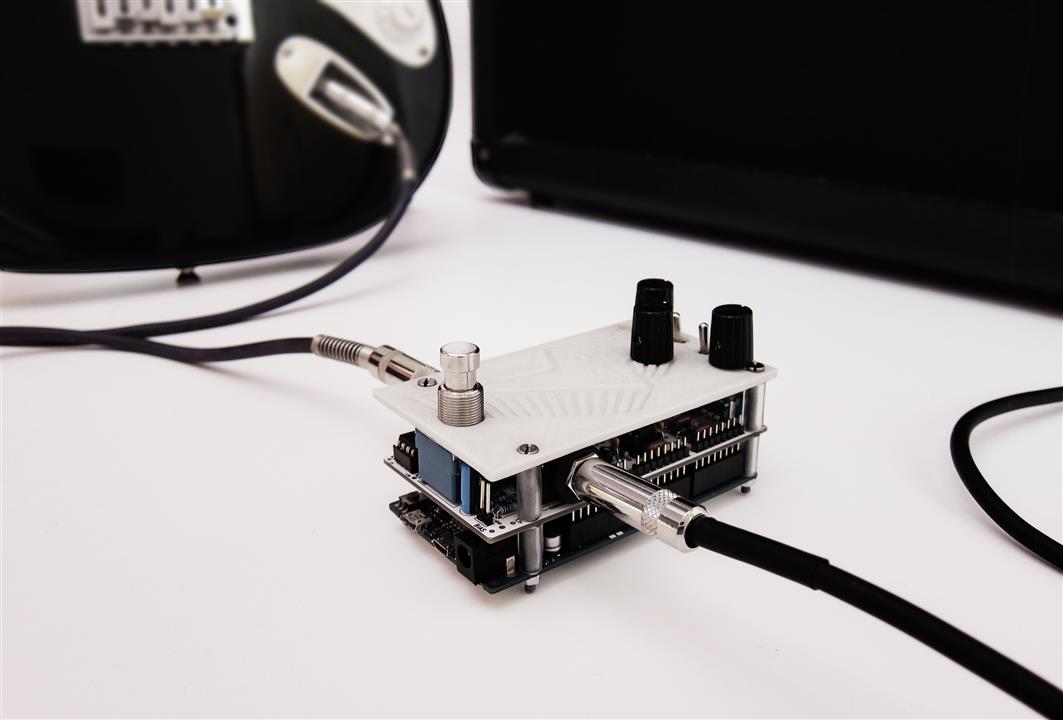
pedalSHIELD DUE is a programmable Arduino Open Source & Open Hardware guitar pedal made for guitarists, hackers, and programmers. Users can program their own effects in C/C++ or download ready effects from the online library.
It is designed to be a platform to learn about digital signal processing, effects, synthesizers and experiment without deep knowledge in electronics or programming.
l
How Does it Work?
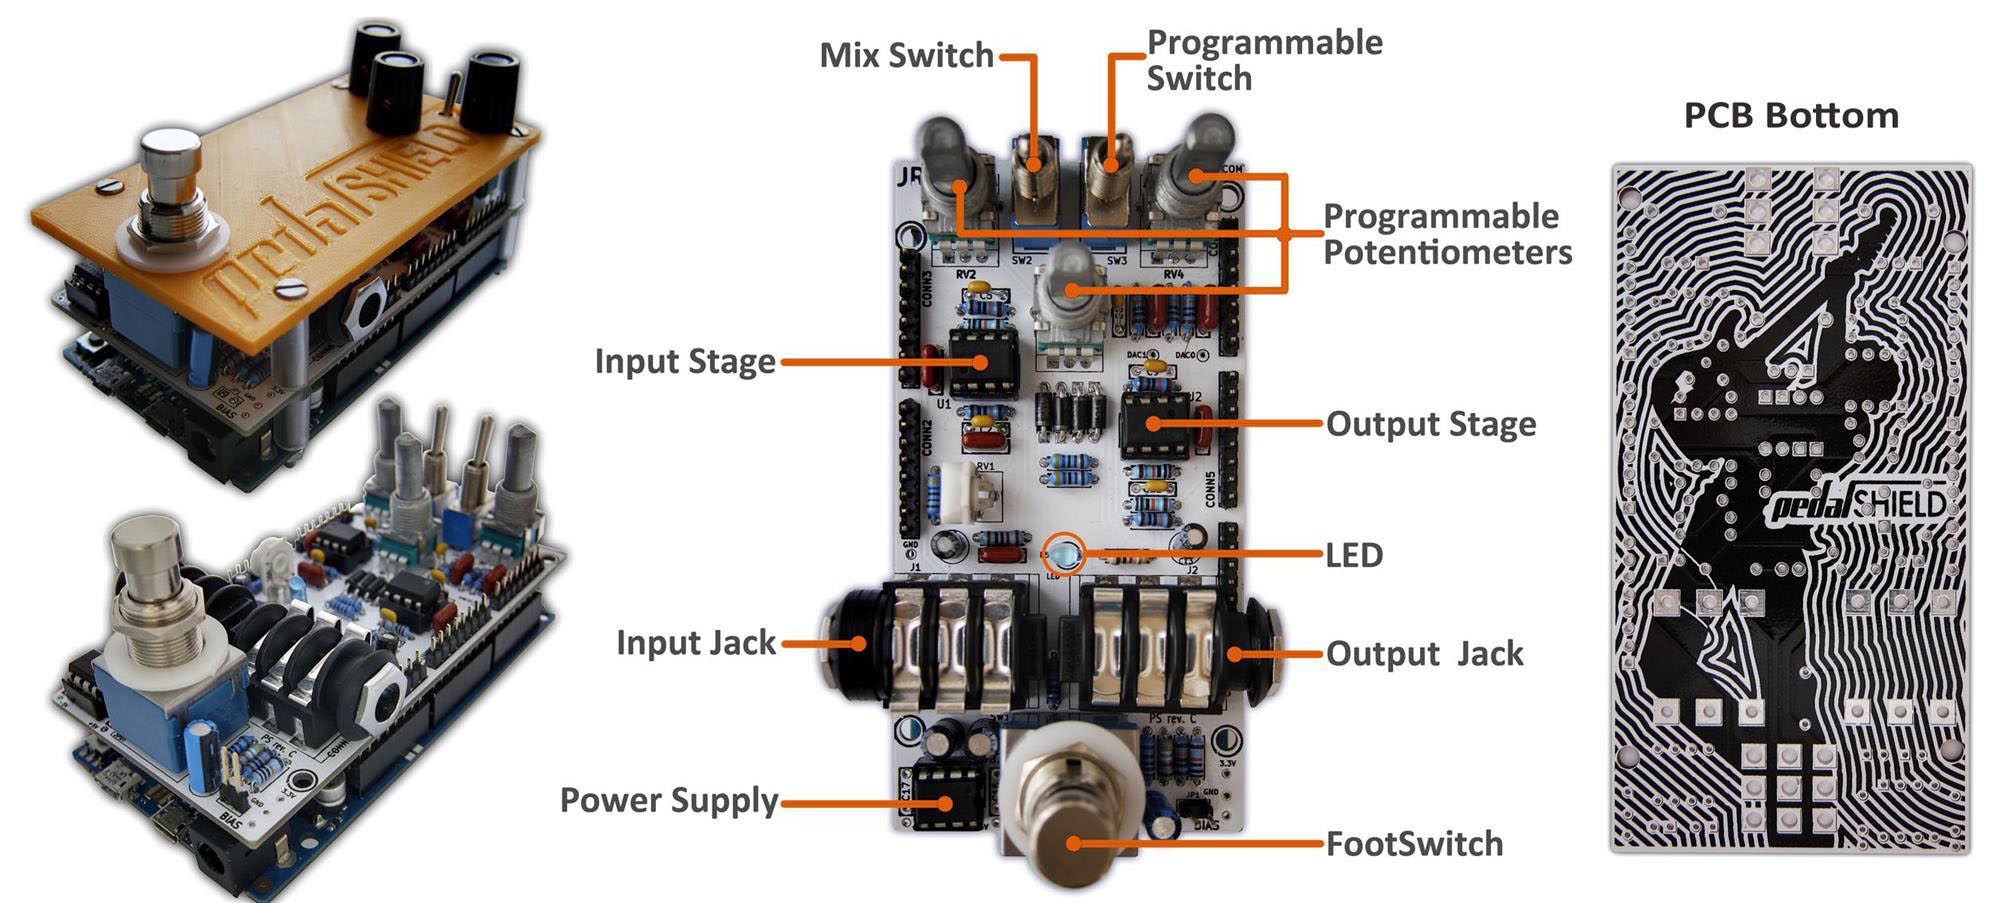
The shield has three parts:
- The Input Stage or Preamp: Amplifies the guitar input signal and sends it to the Arduino DUE microcontroller to be processed.
- Arduino DUE Board: It does all the Digital Signal Processing (DSP) modifying the signal and adding the effect (delay, echo, distortion, volume...).
- The Output Stage: Once the waveform is processed, the signal is taken from the Arduino DACs and prepared to be sent to the Guitar Amplifier.
This part also includes a Summing Amplifier which is very useful for delay effects like echo or chorus.
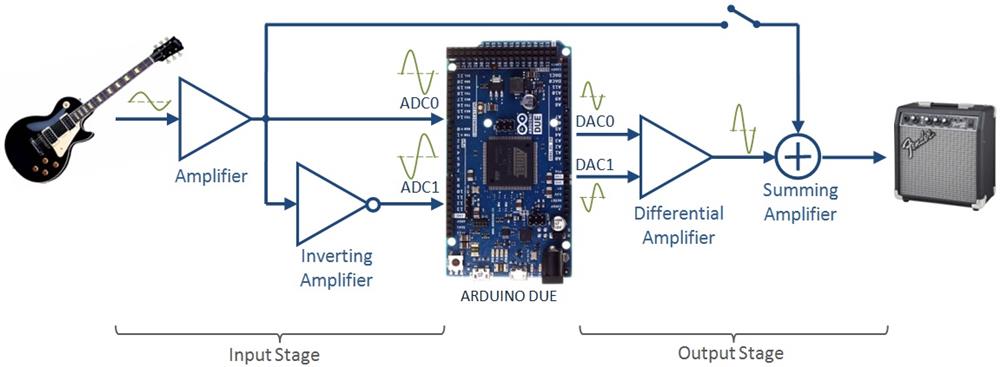
pedalSHIELD uses 2 ADCs and 2 DACS in parallel in order to achieve higher bit resolution (2 x 12bits). However, using only 1 DAC and 1 ADC is possible without modifications. You can check all the details in the hardware design section and in the pedalSHIELD Hardware forum.

How to Program it?
The shield is programmed in C/C++ using the standard free Arduino platform (Linux/Windows/Mac). All tools and programs are open-source and compatible with Arduino libraries.
Basic knowledge of C is needed. The best way to show how to program it is showing an example pedal:
1. Clean Volume/Booster Pedal:
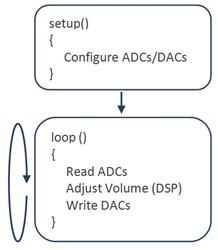
This code creates a Volume/Booster pedal, the architecture of the program looks like
// Licensed under a Creative Commons Attribution 3.0 Unported License.
// Based on rcarduino.blogspot.com previous work.
// www.electrosmash.com/pedalshield

int in_ADC0, in_ADC1;  //variables for 2 ADCs values (ADC0, ADC1)
int POT0, POT1, POT2, out_DAC0, out_DAC1; //variables for 3 pots (ADC8, ADC9, ADC10)
int LED = 3;
int FOOTSWITCH = 7;
int TOGGLE = 2;

void setup()
{
  //ADC Configuration
  ADC->ADC_MR |= 0x80;   // DAC in free running mode.
  ADC->ADC_CR=2;         // Starts ADC conversion.
  ADC->ADC_CHER=0x1CC0;  // Enable ADC channels 0 and 1.

  //DAC Configuration
  analogWrite(DAC0,0);  // Enables DAC0
  analogWrite(DAC1,0);  // Enables DAC0
}

void loop()
{
  //Read the ADCs
  while((ADC->ADC_ISR & 0x1CC0)!=0x1CC0);// wait for ADC 0, 1, 8, 9, 10 conversion complete.
  in_ADC0=ADC->ADC_CDR[7];               // read data from ADC0
  in_ADC1=ADC->ADC_CDR[6];               // read data from ADC1
  POT0=ADC->ADC_CDR[10];                 // read data from ADC8
  POT1=ADC->ADC_CDR[11];                 // read data from ADC9
  POT2=ADC->ADC_CDR[12];                 // read data from ADC10

  //Add volume feature with POT2
  out_DAC0=map(in_ADC0,0,4095,1,POT2);
  out_DAC1=map(in_ADC1,0,4095,1,POT2);

  //Write the DACs
  dacc_set_channel_selection(DACC_INTERFACE, 0);       //select DAC channel 0
  dacc_write_conversion_data(DACC_INTERFACE, out_DAC0);//write on DAC
  dacc_set_channel_selection(DACC_INTERFACE, 1);       //select DAC channel 1
  dacc_write_conversion_data(DACC_INTERFACE, out_DAC1);//write on DAC
}
You can check all the codes and more examples at the pedalSHIELD Software Forum and don't forget the Most Important Topics.
You can listen in SounCloud all the already programmed effects (delay, reverb, echo, metronome, tremolo, distortion, etc...):
{soundcloud}http://soundcloud.com/electro-smash/echo-pedalshield|700|0 {/soundcloud}
{soundcloud}http://soundcloud.com/electro-smash/tremolo-pedalshield|700|0 {/soundcloud}
{soundcloud}http://soundcloud.com/electro-smash/distortion-effect-by|700|0 {/soundcloud}
Specifications:
- Based in Arduino Due.
- Configurable sampling time from 8kHz to 192kHz.
- More than 2200 instructions per sample at 48kHz
- Microcontroller:
- 84MHz 32bit Atmel SAM3X8E ARM Cortex-M3.
- 96KB RAM, 512KB Flash Memory.
- Integrated DMA.
- 12 bit ADC/DAC integrated sampling up to 1Msps.
- Interface:
- 3 Configurable potentiometers.
- 2 Configurable switches.
- Blue power-on led PWM controlled.
- True Bypass Footswitch.
- Connectors:
- Input Jack, 1/4 inch unbalanced, Zin=5MΩ.
- Output Jack, 1/4 inch unbalanced, Zout=100Ω.
- Power supply: power taken from Arduino Due board.
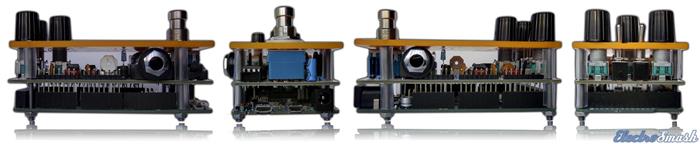
The design was created using KiCad, an open-source GNU free of charge electronic design CAD tool. All schematic native files and bill of materials are public. The circuit can be broken down into 5 simpler blocks: Power Supply, Input Stage, Output Stage, User Interface and Arduino Connectors:
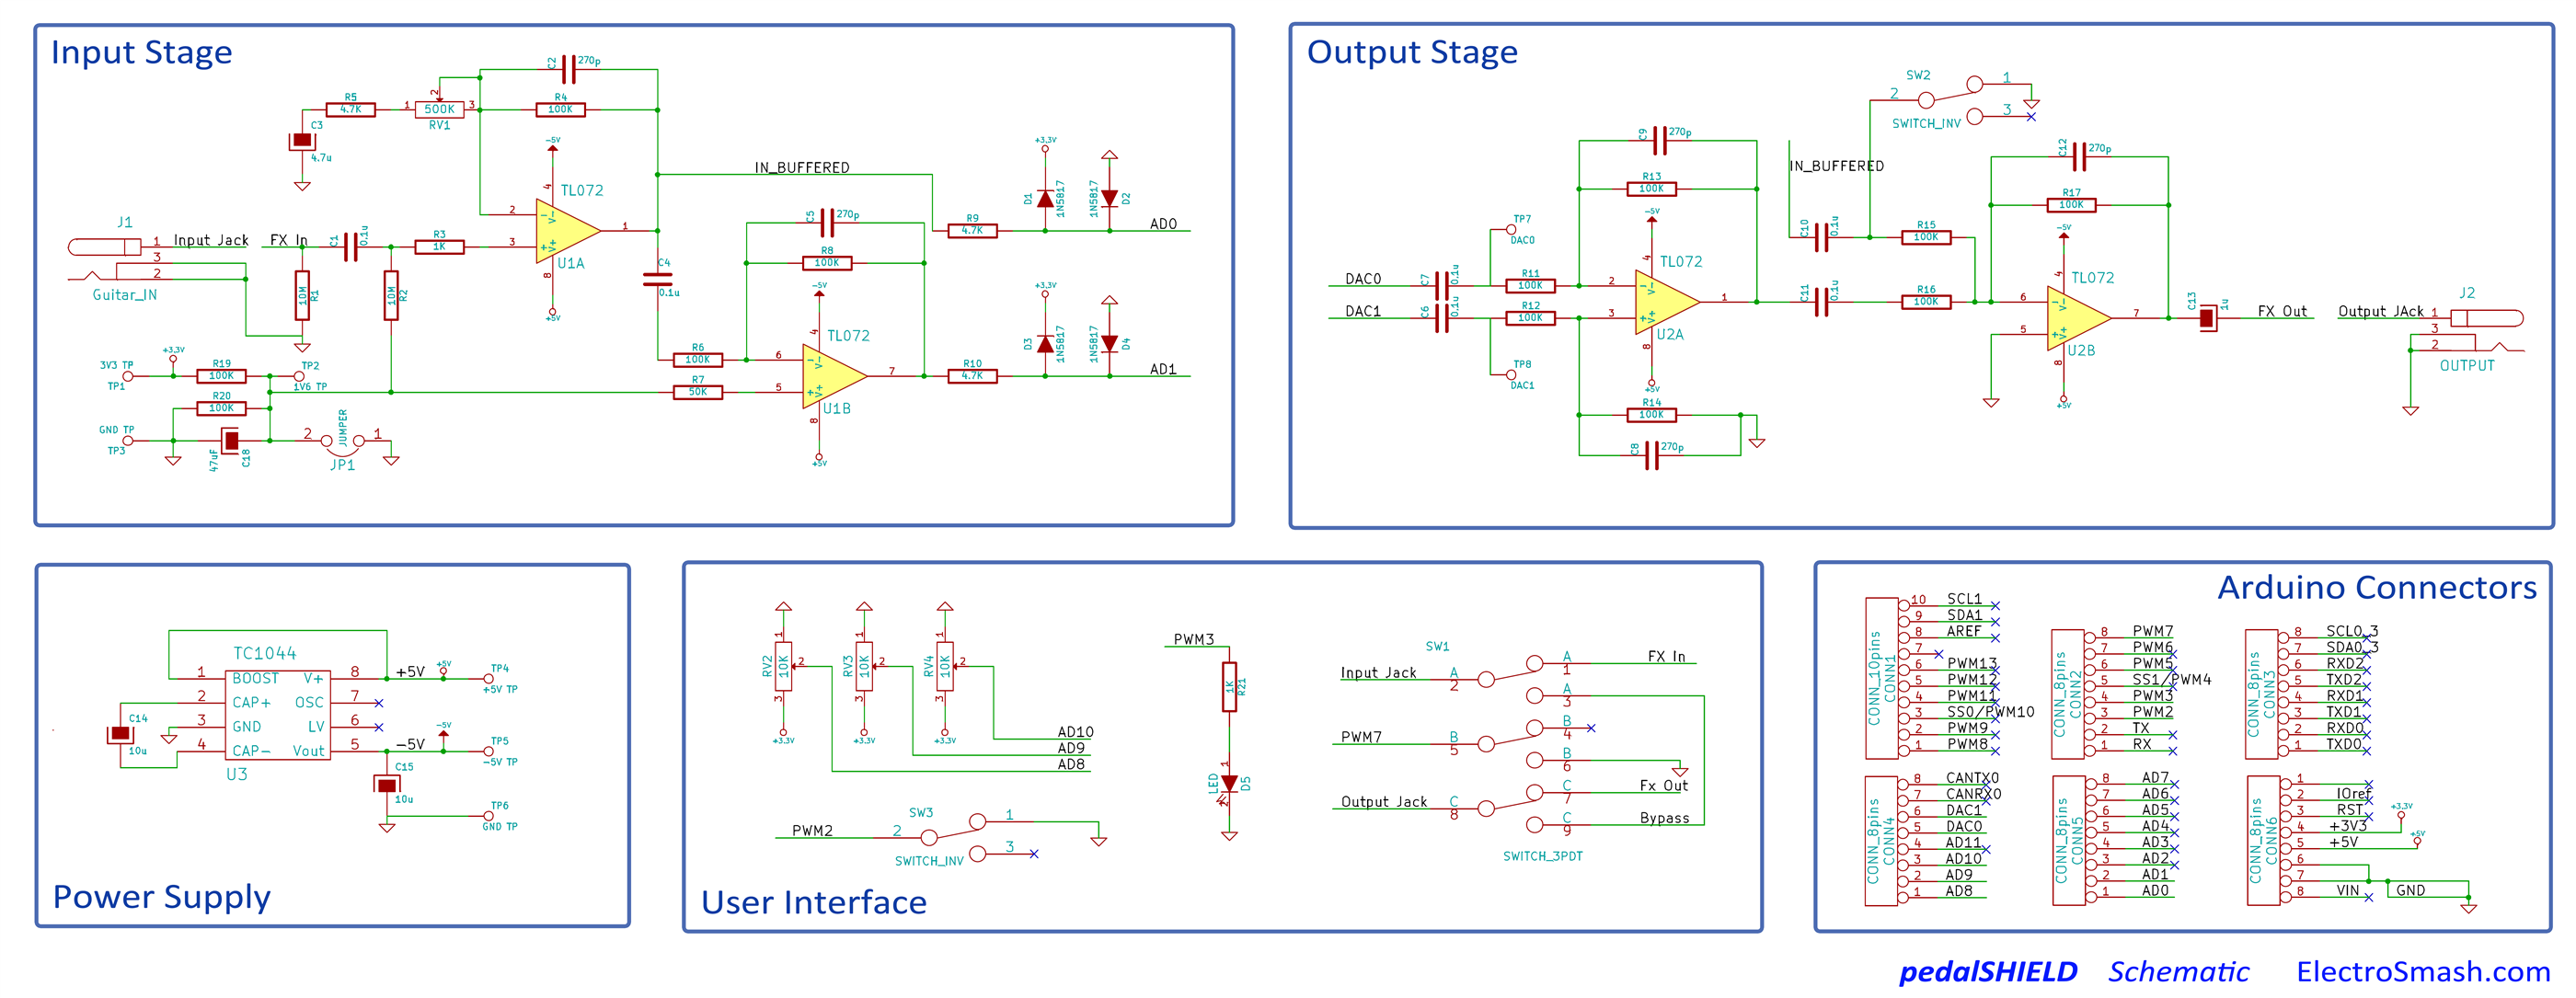
The functionality is simple; 2 opamps will prepare the signal to be digitized and also 2 opamps will recover the signal from
the microcontroller. Two ADCs in parallel can be used to read the guitar signal, improving the bit depth (2x12bits). Furthermore, this arrange is also compatible with the "Double Span and Digitize Signals using Two ADCs" by placing the Jumper1.
- Input Stage / Preamp: The guitar signal is amplified for better acquisition by the first op-amp which follows the MicroAmp guitar pedal design. The trimmer VR1 adjusts the gain of this amplifier. There is also a program which helps to automatically adjust this trimmer. The second inverting op-amp inverts the amplified signal to be applied to the ADC1. The Diodes D1, D2, D3, D4 are clamping diodes that protect the Arduino's ADC from signals above 3,3V and below 0V.
- The Output State: Using a Differential amplifier (Gain=1) two DACs can be read in parallel improving the bit resolution (2x12bits). However, if a signal is generated at DAC0 and DAC1 is not used, the Differential amplifier behaves as a normal Buffer. The last op-amp is in a Summing configuration, adding the processed signal and the original one if the Mix Switch is ON. This stage is very convenient to implement some pedals like delay, flanger, chorus, metronome, etc..
- The Power Supply: Generates ±5V to feed the operational amplifiers and achieve maximum signal swing without distortion.
- User Interface: The player can use 3 programmable potentiometers, 2 switches, 1 LED and the 3PDT True Bypass footswitch.
- Arduino Connectors: 5 pin headers link the shield with Arduino DUE transferring the signals.
There are 2 options in the online shop:
- Order only the PCB. It uses easy-to-find standard components and you can build the kit yourself. The bill of materials is public with all the references and the Mouser part numbers.
- Order the Full Kit: This kit includes the PCB, cover and all the components to build pedalSHIELD at home (you just need to add the Arduino DUE board).
All the transactions are done through PayPal for maximum security (also accepting Credit Card).
If you have any question, contact us.
Bill Of Materials:
The components were selected using easy-to-find through-hole parts and a minimum number of references. You can also download it in txt, pdf, excel or open office format.
| pedalSHIELD Bill of Materials /Parts List | ||||
| Value | Qty | References | Description | Mouser Reference |
| Capacitors | ||||
| 270p | 5 | C2 C5 C8 C9 C12 | Ceramic Disc Capacitors | 140-50S5-271J-RC |
| 0.1u | 6 | C1 C4 C6 C7 C10 C11 | Film Capacitors. | ECQ-V1H104JL |
| 1u | 1 | C13 | Aluminium Electrolytic Capacitors | ECE-A1HKA010 |
| 4.7u | 1 | C3 | Aluminium Electrolytic Capacitors | ECE-A1EKA4R7 |
| 10u | 2 | C14 C15 | Aluminium Electrolytic Capacitors | ECE-A1HKA100B |
| 47uF | 1 | C18 | Aluminium Electrolytic Capacitors | REA470M1CBK-0511P |
| Resistors | ||||
| 1K | 2 | R3 R21 | Metal Film Resistors, 1% Tol. | MF1/4DC1001F |
| 4.7K | 3 | R5 R9 R10 | Metal Film Resistors, 1% Tol. | MF1/4DCT52R4701F |
| 50K | 1 | R7 | Metal Film Resistors, 1% Tol. | MF1/4DCT52R4992F |
| 100K | 12 | R4 R6 R8 R11 R12 R13 R14 R15 R16 R17 R19 R20 | Metal Film Resistors, 1% Tol. | MF1/4DCT52R1003F |
| 10M | 2 | R1 R2 | Metal Film Resistors, 1% Tol. | RK1/4DC1005F |
| 500K | 1 | RV1 | Trimmer Res. -9mm Single Turn | 3319W-3-504 |
| 10K | 3 | RV2 RV3 RV4 | Alpha Potentiometers Flat 20mm | RK09L114001T |
| Plastic Knobs | 3 | RV2, RV3, RV4 | Plastic Knob +crew, Shaft:6.35mm | 450-2023-GRX |
| Others | ||||
| 1N5817 | 4 | D1 D2 D3 D4 | Schottky Diodes Vr/20V Io/1A | 1N5817 |
| LED | 1 | D5 | Through hole, blue led. | C4SMG-BJS-CQ0T0451 |
| SWITCH_3PDT | 1 | SW1 | 3PDT True Bypass Footswitch | 107-SF17020F-32-21RL |
| SWITCH_INV | 2 | SW2 SW3 | Toggle Switch SPDT | 612-100-A1111 |
| Connectors | ||||
| CONN_8pins | 5 | CONN2 CONN3 CONN4 CONN5 CONN6 | ||
| JACKS | 2 | JI, J2 | Neutrix 1/4 stereo Chrome Conn. | NMJ6HCD2 |
| IC's | ||||
| TL072 | 2 | U1 U2 | Operational amplifier. | TL072IPE4 |
| TC1044 | 1 | U3 | Voltage switching regulator. | TC1044SCPA |
| 8PIN SOCKETS | 3 | U1, U2, U3 | 8pin DIP plastic socket. | 1-390261-2 |
| Mechanic | ||||
| pedalSHIELD PCB | 1 | Dual Layer 2x4” PCB soldermask. | ||
| Plastic Protector | 1 | 3D printed plastic cover protector. | ||
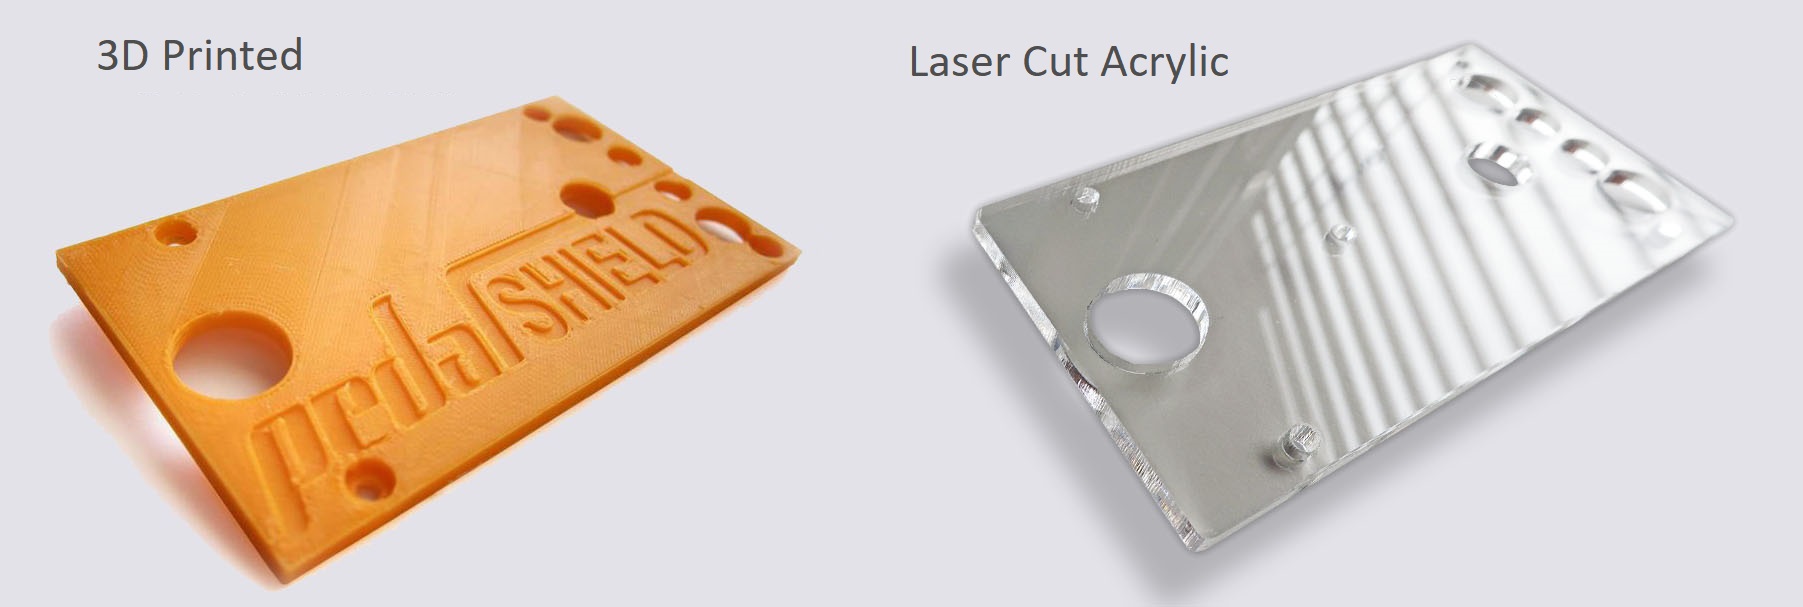
3D Printed Cover
pedalSHIELD includes a custom acrylic cover designed to protect the electronics.
There is a 3D printed cover made of ABS plastic with 3mm thickness and designed by Shuttl3D on Thingiverse, it provides enough robustness and protection to the electronic circuits while adding a touch of color to the pedal. If you have a 3D printer you can use and explore other designs made for pedalSHIELD DUE on Thingiverse.
Once the design was adjusted with the 3D printer, the cover was made of laser-cut plexiglass which is strong and lightweight. The last review is in transparent color which makes easier to check the hardware under it.
Frequently Asked Questions (FAQ):
What is Arduino?
- Arduino is a single-board microcontroller to make using electronics in multidisciplinary projects more accessible. The hardware and software are open-source.
Where can I buy Arduino Due board?
- All major suppliers like Mouser, element-14, Digikey, RS-Online have it in their catalog and also you can find it on eBay and physical electronic shops.
Does pedalSHIELD work with all Arduino boards?
- No, only with Arduino DUE.
Is pedalSHIELD suitable for bass players?
- Yes, but you need to swap 6 capacitors (C1 C4 C6 C7 C10 C11) from 0.1uF to 0.5uF, that is all.
Can I plug headphones directly into pedalSHIELD?
- No, pedalSHIELD is not an amplifier. It needs to be plugged into a guitar amplifier or to a multi-effects (Line 6 pods, etc..).
Thanks for reading, all feedback is appreciated

Some Rights Reserved, you are free to copy, share, remix and use all material.
Trademarks, brand names and logos are the property of their respective owners.


